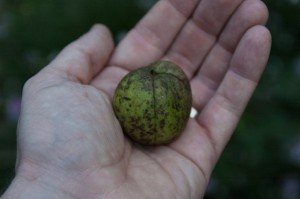
How-to: Hickory Nuts
Since moving up here we’ve tried a lot of new things, from foraging for nuts to hopefully making our own maple syrup. With many of these endeavors we’ve had a challenging time finding clear and succinct how-tos, so as we figure stuff out we’ll be posting simple how-tos – so that we can remember next year and maybe other people won’t have to spend so much time figuring things out.
Here is our first how-to, preparing hickory nuts.
We have a Shagbark Hickory, but this process should hold true for any edible Hickory variety.
In our case these were mostly on the gravel driveway, so some are pretty dinged up from being driven over by the truck. This doesn’t matter, even if some of the green flesh is chipped, as long as there aren’t noticeable worm holes it is fine.
As a total novice I thought that “green” equated to “unripe” and they should be left on the ground – who eats green nuts? This is not the case, the green is the outer protective flesh and isn’t what you will be eating. Green does mean it is too ripe to easily crack, but definitely collect up whatever you can get – green or brown.
You will be cracking this green flesh off to get to the real nut, but if you dry out the hickory nuts and let them “ripen” it’s a lot easier. We put ours in a big wooden bowl on our dinner table and flipped them every day so that they all get some air and don’t rot. We also tried putting them on cookie cooling racks, that worked really well. Once they turn dark brown they will start to split open a little on their own – at this point you are ready for the next step.
 Step 3: Cracking the outer flesh
Once they are dry you can crack open the outer flesh. This is pretty easily done once they are fully dry, it practically falls off. For some you might need to put a butter knife into one of the cracks and pry the flesh off. The flesh should pop off and reveal something more familiar and nut-like – this is the real hickory nut.
You can save the hard outer flesh and use it as you would hickory wood, like putting it in your grill to add a little hickory smoked flavor.
Once it is out of the flesh you can wash off the nut and let it dry on a window sill or table. This can also be done on a screen, the key is to make sure each nut gets enough air all around it so it drys out and doesn’t rot.
The dried nuts can able to store for a long while. Don’t crack them until you want to eat them as they don’t store well once cracked.
Step 5: Crack the nut
This is a fine art. It has taken us a while to get the hang of it. When if first read about these nuts everything was about how hard they were so I expected to need some heavy machinery. The shell is hard, but no worse than a walnut. It is smaller than a walnut, with less internal structure, so it is easy to crush the whole thing – mixing nut meat with shell. Personally we just used a regular nut cracker, but were careful not to crush it. But after the first couple it goes pretty smoothly.


